Most people who buy a Hall Effect board plug it in, type for ten minutes, and never open the configuration app. That is the whole problem. A magnetic switch keyboard straight out of the box behaves like a normal mechanical keyboard with a slightly odd feel, and you paid for the adjustable part.
Hall Effect keyboard setup comes down to four decisions: how far a key travels before it registers, how fast it resets when you let go, how often the board reports to your PC, and which keys get their own rules. Get those right and a budget board can out-react a flagship for the way you actually use it. Get them wrong and you own a keyboard that double-types in a document and feels broken in a game.
I type for a living. Eight hours a day of code, plus whatever game I am losing at that night, and I have run both of the boards below through that routine. Here is the setup order I use, the settings I would start with, and the caveats nobody mentions until you are three hours into troubleshooting.
Why you should trust me
I am Theo, a software engineer in Austin with 14 custom boards built and more switch sets than I have shelf space for. My roommate negotiated the keycap shelf. That is a real sentence about my living room.
What I care about is boring and repeatable: how a board feels after two weeks of daily typing, whether the stabilizers rattle, whether the switches are hot-swap, and whether I would happily use it for a full work week. Unboxing impressions are not reviews. A board that feels great for an hour and annoying by Thursday is a board I will tell you to skip.
I also write code on everything I touch, which is a harsher test than a benchmark. A key that fires slightly wrong shows up fast when you type brackets and semicolons all day.
How I picked and how I tested
Hall Effect is not a marketing word, it is a different sensing method. A conventional mechanical switch closes a metal contact at a fixed point. A magnetic switch has a magnet in the stem and a sensor on the PCB that reads the stem's position continuously. That means the actuation point is a number in software, not a piece of metal. It also means the switch can reset the instant you start moving back up, which is what rapid trigger actually is.
So the criteria I use on any board in this category are: how wide the adjustable actuation range is, whether rapid trigger is per-key, what polling rate the board reports, whether the configuration software is usable without an account, and how the stabilizers sound. That last one still tells you more about build quality than the case material.
I run every board through the same checklist. Two weeks of daily typing first, because that is where a keyboard either disappears into the background or starts annoying you. Then a stabilizer rattle test on space, both shifts, enter, and backspace. Then I look at what the board gives you in the box versus what it makes you install.
The two boards here sit at opposite ends of that spectrum. One is a 60% wired board with a very aggressive polling rate, and one is a full-size wireless board with the layout most people actually need for work. Both use magnetic switches and both let you do everything in this guide.
The two boards I would set up first
You do not need a flagship to get the full Hall Effect experience. You need adjustable actuation, rapid trigger, and software that does not fight you. These two cover the budget end and the do-everything end.
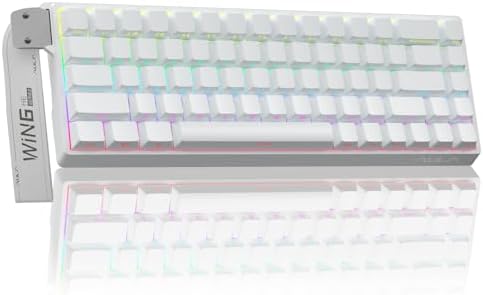
Budget pick: AULA WIN68 HE Mechanical Gaming Keyboard 60%
 Visit on Amazon →
This is the board I would hand someone who wants to try magnetic switches without committing real money. It is a 60% layout, wired, black, RGB backlit, with Hall Effect magnetic switches, adjustable actuation, a fast trigger mode, and an 8000Hz polling rate. Check current Amazon price before you decide, because the value story here is the whole point.
The 8000Hz polling number is the headline spec and it is also the one you should be careful with. Reporting eight times more often than a standard board is real, but it is not free. On an older CPU or a machine already loaded with background software, you can introduce stutter that feels worse than the responsiveness you gained. Start at a lower rate, test, and only climb if your system stays smooth.
The 60% layout is the other tradeoff. No function row, no numpad, no dedicated arrows, so everything you need lives on a layer. That is fine for gaming and fine for a writer, and it is genuinely annoying if you live in spreadsheets. The upside is desk space for mouse movement, which is the reason 60% boards exist.
Flaws but not dealbreakers: Wired only, so cable management is your problem. And the compact layout means you will spend the first week reaching for keys that are not there.
Anyone building a first gaming-focused magnetic board on a budget, or adding a second board for a small desk, should start here.
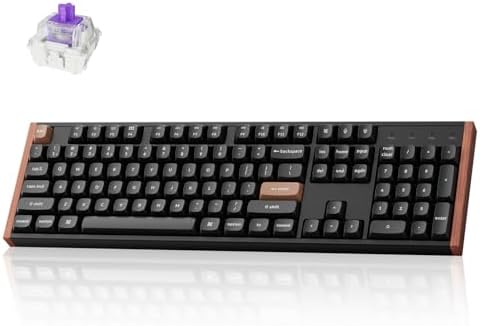
Full-size pick: Keychron K10 HE Full-Size Hall Effect Keyboard Wireless, Rapid Trigger
 Visit on Amazon →
Keychron is the best value brand in this hobby and the K10 HE is the version of that argument for people who want a number pad. Full-size layout, wireless, Hall Effect switches, rapid trigger support. Check current Amazon price, because this one costs meaningfully more than the AULA and you should know the gap before you pick a side.
For work, this is the easier recommendation. A full-size board means you are not relearning muscle memory for arrows and function keys, and the wireless connection means one less cable on the desk. Keychron's reputation is built on giving you a board that feels like it costs more than it does, and the HE line carries that forward.
Two things to watch. First, wireless plus RGB is a battery equation, so if you leave the backlight cranked you will be charging more often than you want. Second, a full-size board takes up a lot of desk, and if your mouse hand is already fighting for room, the 60% above solves a problem this one creates.
Flaws but not dealbreakers: Heavier and wider than anything you would call portable, and the wireless convenience is only convenient if you actually keep it charged.
Anyone who types all day and games at night, especially if you use a number pad for work, will get more out of this board than the compact one.
The actual setup workflow
Now the part you came for. This order matters, because changing actuation before you update firmware is how you end up troubleshooting ghosts.
Step one: Update the firmware and install the config software. Do this first, on a wired connection, before you touch a single setting. The AULA configures through its own desktop app, and the Keychron configures through a browser-based configurator, so you may not have to install anything for that one. If the vendor's app wants an account to change your lighting, walk away from that feature and use the on-board shortcuts instead.
Step two: Set a baseline actuation depth. This is the distance the stem travels before the key registers. Start at 2.0mm for typing. That is deep enough that resting fingers do not fire keys, and shallow enough that you feel the difference from a standard board. Do not start at the shallowest setting because a review told you it was faster. You will type like a person wearing oven mitts for a week and blame the keyboard.
Step three: Go shallower only for gaming, and only on the keys that matter. WASD and the keys around them can sit at 1.0mm to 1.5mm. Everything else stays at 2.0mm. Per-key actuation is the entire reason to own this kind of board, so use it instead of applying one global number to 68 or 104 keys.
Step four: Turn on rapid trigger, but only for games. Rapid trigger resets the key the moment you release pressure rather than waiting for the stem to return past a fixed point. That is the feature that makes counter-strafing feel instant. It is also the feature that turns a sloppy keypress into a double input in your code editor. Keep it on a separate profile and switch profiles, do not leave it on all day.
Step five: Tune the rapid trigger sensitivity conservatively. Start around 0.1mm to 0.2mm of release travel. Lower than that and your finger's natural bounce starts registering as input, which shows up as keys that fire twice on one press. If that happens, raise the number before you blame the board.
Step six: Set your polling rate deliberately. If the board offers a high polling mode, try it and then try a lower one. Play the same game for twenty minutes on each and watch for stutter, frame pacing weirdness, or a CPU fan that suddenly has opinions. High polling is a real improvement when your system handles it and a downgrade when it does not.
Step seven: Kill debounce. Magnetic switches do not have contact bounce the way metal contacts do, so any debounce delay in the software is pure added latency. If there is a debounce setting, set it to zero and leave it there. This is one of the few places where the Hall Effect design gives you something a normal mechanical switch simply cannot.
Step eight: Build layers for the layout you actually have. On the 60%, map arrows to a layer under your right hand and put the function row somewhere reachable. On the full-size board, use the extra keys for media controls and a second gaming layer. Ten minutes of remapping saves you a month of reaching.
Step nine: Listen to the stabilizers and fix what rattles. Press space, both shifts, enter, and backspace slowly and listen for a metallic ping. That rattle is the difference between a board that sounds expensive and one that sounds cheap. If it rattles, lube the stabilizers. There is a fix for almost everything in this hobby, and this is the cheapest one.
Step ten: Type on it for a week and adjust once. Set your numbers, close the software, and stop fiddling. After seven days you will know which keys are too shallow and which are fine. Change those, then leave it alone.
Caveats that will bite you
Magnetic switches are not interchangeable with the MX switches in your drawer. A Hall Effect board needs Hall Effect switches, so that switch collection you have been hoarding does not transfer.
Strong magnets near the board can confuse the sensors. That sounds like a joke until you set a magnetic phone mount or a speaker on the desk next to it.
Some competitive leagues and tournament organizers have restricted rapid trigger and similar reset tricks. If you play in anything organized, read the rulebook before you build your muscle memory around a feature you cannot use on stage.
And the honest one: none of this makes you better at your job or your game by itself. It removes a small amount of input delay and gives you control over how your keyboard feels. That is a real improvement, and it is not a personality.
What this all costs
The AULA is the budget entry and the Keychron is the full-size, wireless, do-everything option. Check current Amazon price on both and do the math on what you are actually buying.
- If you keep a board for three years of daily use, the price difference between the two works out to a few cents a day.
- The setup costs nothing. The software is free and the settings above take about twenty minutes.
- The one upgrade worth paying for later is a set of keycaps you like, and even that is optional.
Spread over the life of the board, the cost is not the deciding factor. The layout is. A 60% board that you fight every day is worse than a full-size board that costs more, and a full-size board that crowds out your mouse is worse than the compact one.
Set the actuation, tune the rapid trigger, pick a polling rate your machine can actually feed, and then go type on it for a week. That is the whole job. Your keyboard was built to be adjusted, so adjust it.