A full size mechanical keyboard is the least fashionable object in this hobby right now. Everyone posts a 65 percent with a rotary knob and a coiled cable, and meanwhile the people who actually type for a living keep a numpad on the desk because a numpad is throughput, not nostalgia. If you spend eight hours a day in an IDE, a spreadsheet, or a ticketing system, the extra width pays for itself in a week.
The problem is not the board. It is that most people unbox it, plug it in, and never touch anything again. Then they wonder why the spacebar sounds like a tiny tambourine and why their wrists ache by Thursday afternoon.
This is the setup process I run on every full size mechanical keyboard that lands on my desk, and it works whether you bought the cheapest thing on sale or something aluminum and heavy. It takes one evening, it costs nothing, and it is the difference between a keyboard you tolerate and a keyboard you stop noticing.
Why you should trust me
I write software for a living, which means whatever board is on my desk gets typed on for full workdays, not for a five minute unboxing video. I have built more custom boards than is reasonable, I own more sets of switches than I own socks, and I test every board the same way: two weeks of daily coding, a stabilizer rattle test, and a switch feel comparison done with my eyes closed so that I am judging sound and feel instead of the colorway.
That standard does not move. Not "feels premium." Not "great for gaming." Two weeks, rattle test, ears open.
How I judge a board before it earns a recommendation
Before any keyboard gets a sentence out of me, it has to answer four questions. They are boring and they are the whole job.
Can I type on it daily for two weeks? Not an hour. Not a weekend. Fourteen days of real work, including the day you are frustrated and typing fast. Boards that feel great in a demo often reveal a stiff spacebar or a hollow case by day nine.
Do the stabilizers rattle? This is the build quality tell, and it is more reliable than case material, weight, or price. A rattle is that metallic buzz you hear under the spacebar and the shifts. Cheap boards all do it. Some expensive boards do it too, which is why I check.
Are the switches hot-swap? In 2026 this is close to non-negotiable. Soldering is a hobby, not a requirement, and if you cannot pull a switch out and drop another one in, you are stuck with your first decision forever.
Would I use it for a full work week? That is the real test. If I would quietly move it off the desk by Wednesday, it does not matter how good it looked in the photos.
Notice what is not on that list. RGB is not on it. Brand heritage is not on it. Case material is not on it. Keycap quality is on it, and so is the sound, because a board that sounds wrong will annoy you long after you have forgotten what you paid.
The full-size pick I start most people on
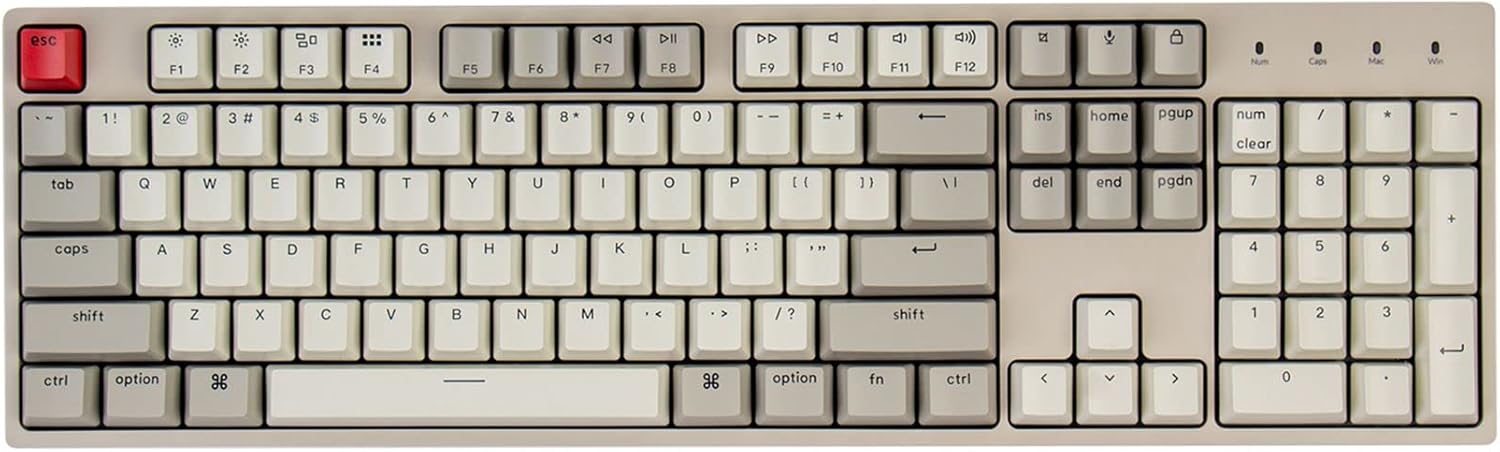
The full-size pick: Keychron C2 Full Size Wired Mechanical Keyboard, Brown Switch, Retro
 Visit on Amazon →
This is the board I point full size beginners at, and the reason is not excitement. It is that the C2 gives you the full layout, the numpad, and the navigation cluster in one piece, wired, with Brown switches, and Brown is the safest first switch in the hobby. It has a small tactile bump with no click, which means you can feel where the key actuates without announcing every keystroke to the rest of the office.
If you have only ever typed on a laptop scissor switch or a linear gaming board, tactile is the right place to start, because it teaches you what switch feel actually is. Once you know that, you can decide whether you want a smoother linear or a louder clicky. Until you know it, you are guessing.
Wired is the other half of the pitch. There is no battery to charge, no dongle to lose, no wireless sleep that eats the first character of a sentence because the board was napping. I test battery life the way I test switches, and I will take a cable over a dying battery mid-sentence every single time. The tradeoff is a cable on the desk, which is why the routing step below matters more than people expect.
The retro colorway is the part you either love or you do not. It is a look, not a feature, and it will clash with a black desk mat in a way that is either charming or infuriating depending on your personality.
Flaws but not dealbreakers: Two things to verify before you buy, because they vary across full size boards at this tier and I will not pretend otherwise. First, check whether the version you are looking at is hot-swap, since that determines whether you can change switches later without a soldering iron. Second, check what software or remapping the board supports, because if you want custom layers, that is the feature you will miss first.
Anyone who wants a numpad, types more than they game, and does not want to think about charging a keyboard should start here.
The actual setup workflow
Now the part you came for. This works on any full size mechanical keyboard, and none of it requires opening the case unless you want to.
Step one: Test every key before you form an opinion. Open a keyboard tester in a browser and press every single key, including the numpad, the arrow cluster, and the six keys above the arrows. A dead key on day one is a return, not a project. Do this before you fall in love with the sound, because falling in love makes people keep broken boards.
Step two: Rattle test the stabilizers. Press the spacebar slowly, then both shifts, then enter and backspace. Listen at the left end and the right end of each key separately, because a stabilizer can rattle on one side only. What you are listening for is a metallic buzz that rings after the key bottoms out. That is the sound of a wire moving in a housing that does not hold it.
Step three: Fix the rattle if you find it. The cheapest fix in this entire hobby is a small amount of dielectric grease or keyboard lube on the stabilizer wire. A little goes a long way and too much makes the key feel sluggish, so start tiny. If you are not comfortable opening the board, this is the one step worth paying someone else to do, or worth tolerating until you upgrade.
Step four: Check the keycaps are seated. Press down firmly on every cap, especially the wide ones. Caps that are not fully seated wobble, and a wobbling spacebar will convince you the board is worse than it is. If a cap is crooked, pull it and reseat it before you blame the switch.
Step five: Set the angle and the wrist position. Feet up or feet flat is a real decision, not a default. Flat is generally better for your wrists over a long day, and a slight negative tilt is better still if your desk allows it. If your wrists float above the desk, the board is too high, and no switch in the world fixes that.
Step six: Route the cable properly. Run it behind the board and toward the back of the desk, not across the front where your mouse hand will catch it. Leave slack at the connector so that a tug on the cable pulls slack instead of the port. Wired boards die from strain on the connector far more often than from electronics.
Step seven: Confirm the layout on your operating system. Check that the numpad types numbers and not navigation, that the function row does what you expect, and that your OS is set to the right keyboard layout. Half of all "this keyboard is broken" reports are a Num Lock or a layout setting.
Step eight: Test rollover with a tester. Hold two keys, then three, then five, and see whether the tester registers all of them. If your board supports it, this is where you find out. If you are a fast typist, this is the difference between clean text and dropped characters.
Step nine: Remap exactly one key. If your board supports remapping, change one thing you actually use, such as turning Caps Lock into something useful. One change. Not fifteen. Every remap you add is muscle memory you have to rebuild, and rebuilding five at once is how people decide they hate a keyboard.
Step ten: Live with it for two weeks. This is the step nobody does. Use the board for real work for fourteen days before you change anything else. If you stop noticing the keyboard somewhere in week two, it is good. If you are still fighting the spacebar on day ten, change one variable at a time: a keycap, a stabilizer, a switch. Never all three.
What this process will not fix
A setup cannot rescue a board that is fundamentally wrong for you, and I would rather say that than sell you a workflow.
No amount of tuning will make clicky switches quiet. If your office has an open floor plan, the switch choice is the whole decision and the rest is decoration.
No amount of lube will fix a case that rings like a drum. Sound is roughly half the board and half the desk, so a hollow case on a hollow desk will stay hollow. A desk mat helps more than people admit, but it is a bandage.
A wired board is wired. If you move between a desk and a couch and a conference room, the cable is a real cost, and no setup step removes it.
And if the board is not hot-swap, your switch decision is permanent. That is not a flaw in this process, it is a limit of the hardware, and it is the reason I put hot-swap on my four question list.
When a full size board is the wrong call
Full size is a tool for people who use the numpad and the navigation cluster. If you do not, you are paying for width you never use, and that width costs you mouse travel every single day. Tenkeyless and 75 percent layouts exist for exactly this reason, and if you have never once reached for the numpad in a month of work, that is your answer.
The other case is desk space. A full size board plus a large mousepad plus a monitor stand is a lot of real estate, and on a narrow desk something has to give. Measure before you buy, not after.
But if you type numbers all day, if you enter data, if you work in a spreadsheet or an accounting tool or a terminal with numeric arguments, then full size is not nostalgia. It is the correct tool, and the setup above is how you make it feel like one.
The math, in time instead of money
The setup costs an evening. The rattle test costs five minutes. The two week trial costs nothing but patience, and it is the only part of this that actually predicts whether you will still like the board in a year.
Compare that to the alternative, which is buying a second board because the first one rattled and you never found out that a drop of lube was the whole problem. The people who stay in this hobby happily are not the ones who spend the most. They are the ones who set the board up properly once and then stopped thinking about it.
That is the job. Set it up, type on it for two weeks, and let the keyboard disappear.