Most people buy a budget mechanical keyboard, plug it in, and decide inside a week that mechanical keyboards are overhyped. The spacebar pings, the case flexes, the keycaps feel like a cereal box, and the board ends up in a drawer next to a laptop that was never the problem. Almost none of that is about the price. Most of it is about setup.
A budget mechanical keyboard is a starting point, not a finished product. The factory does not tune stabilizers, does not break in switches, and has no idea whether you type at a standing desk with a tray or on a couch with the board on your knees. Those are your variables, and they matter more than the gap between a cheap board and an expensive one.
I have built 14 custom boards and typed through more than 30 sets of switches, and the pattern never changes: the people who hate their cheap board never did the hour of work that makes it good. Here is that hour, in order.
Why you should trust me
I'm Theo. I write code eight hours a day in Austin, which means whatever board sits on my desk has to survive a full work week before it earns an opinion from me. I test every keyboard the same way: two weeks of daily typing, a stabilizer rattle test with the board powered off and on, and a blind switch comparison where I type the same paragraph on three boards without looking down.
I keep a running spreadsheet of rattle scores, because cheap boards all rattle out of the box and the useful question is whether the rattle is a design flaw or a five-minute fix. That distinction is the reason this article exists.
How I picked and how I tested
For a first mechanical keyboard, the requirements are boring on purpose: full-size layout for anyone who lives in a spreadsheet, a wired connection that never dies mid-sentence, and lighting you can change without creating an account somewhere.
The order of operations matters more than the parts list.
- Stabilizers first. Rattle is the loudest tell of build quality. If the spacebar sounds like a coin in a can, nothing else about the board matters yet.
- Keycaps second. Cheap ABS plastic goes slick and shiny where your fingers rest, and you notice that long before you notice case material.
- Switch type third. Blue switches are clicky and loud, which is a feature when you are alone and a problem on an open mic.
- Hot-swap fourth. Being able to pull a switch without a soldering iron is the difference between a board you keep and a board you replace.
Both boards below are wired, full-size, and aimed at the same buyer: someone who wants a mechanical keyboard for work and games without turning it into a hobby.
Two boards worth setting up
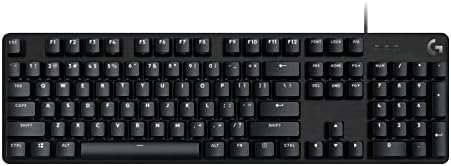
The workhorse pick: Logitech G413 SE Full-Size Mechanical Gaming Keyboard - Black
 Visit on Amazon →
This is the board I point at when someone wants a full-size mechanical keyboard and does not want a project. It is black, it is full-size, and it is aimed at the person who types in a spreadsheet and games in the same session. Check current Amazon price.
The reason to start here is the layout. A full-size board gives you the number pad, and if you do any data entry at all you will miss it the moment it is gone. It also makes the board wider, which changes where your mouse sits, so plan the desk before it arrives rather than after.
What to check in the first hour: type a full paragraph using the spacebar and the left shift. Those two keys carry the stabilizers that rattle first on any board, cheap or expensive. If they sound even and quiet, you got a good unit. If one pings, that is the first thing to address.
Flaws but not dealbreakers: a full-size board eats desk space, and a black case shows dust. Neither is a reason to skip it. If you have a narrow desk and a trackpad habit, a tenkeyless layout will suit you better.
Anyone who wants one board for work and play and refuses to think about it again should start here.
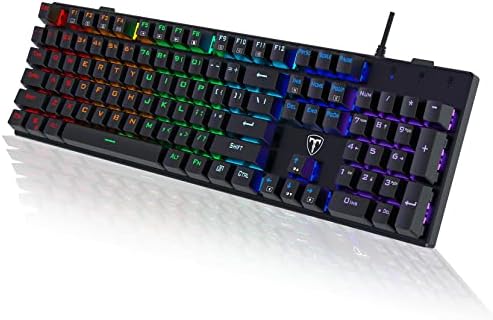
The budget RGB pick: RisoPhy Mechanical Gaming Keyboard, RGB 104 Keys Ultra-Slim LED Backlit USB Wired Keyboard with Blue Switch, Durable Abs Keycaps/Anti-Ghosting/Spill-Resistant Computer Keyboard for PC Mac Xbox Gamer
 Visit on Amazon →
The RisoPhy sits at the other end of the budget range: 104 keys, RGB backlighting, an ultra-slim profile, and blue switches. Check current Amazon price.
Blue switches are clicky. That means a tactile bump plus an audible click on every keystroke, so you will hear yourself type. If you share a room, share an office, or sit on calls all day with an open mic, that click is the entire decision. If you work alone with headphones on, it is one of the most satisfying things you can get for the money.
The spill-resistant and anti-ghosting claims are the two features worth verifying yourself. Spill resistance is a coating and a drain path, not a waterproof promise, so a knocked-over mug is still a bad afternoon. Anti-ghosting matters when you hold three keys at once in a game, and the way to test it is to open a keyboard tester in a browser and press your movement keys together with shift and space.
What to check in the first hour: the keycaps. ABS is the value plastic of the keycap world and it goes glossy where your fingers sit, which is cosmetic rather than functional and is the trade you accept for RGB at this level. Also check the slim profile against your wrists, because an ultra-slim board without a wrist rest puts your hands at a flatter angle than a standard board does.
Flaws but not dealbreakers: RGB software that wants an account to change a color is a pet peeve of mine. Set your lighting once, then leave the app alone, or use the onboard shortcuts and skip the driver entirely.
Anyone who wants backlighting, a number pad, and clicky switches on a small budget should look here.
The actual setup workflow
Now the part that turns either board into something you actually enjoy typing on.
Step one: give it 48 hours before you judge it. New switches feel stiff and slightly scratchy. That is break-in, not a defect. Type on it for two days before you decide anything. If you stop noticing the keyboard by day three, that is the highest compliment a board can get.
Step two: run the rattle test. Turn the board off. Press the spacebar, the left shift, the right shift, enter, and backspace, one at a time, slowly. Listen for a metallic ping after the key bottoms out. Then repeat with the board powered on, because backlighting and desk noise can mask the sound. Note which keys rattle.
Step three: decide whether to fix or return. On a hot-swap board you can pull the switch and address the stabilizer wire yourself. On a soldered board like either of these, opening the case is the only way to reach the wire, and that is not a beginner job. The realistic move is to return the unit inside the return window and try another one, because unit variance on cheap boards is real. If you keep it, a desk mat under the board softens the hollow part of the ping without opening anything.
Step four: set the feet and the angle. Flip the board over and decide whether you want the rear feet up or the board flat. Flat is usually kinder to your wrists. Raised is what most people are used to from a laptop. Try each for a day rather than guessing.
Step five: test rollover in a browser tester. Open a keyboard tester and hold your movement keys plus shift and space at once. If a key drops out, you found the anti-ghosting limit before it costs you a match.
Step six: set the backlight once and close the software. Keep brightness low enough that it does not wash out the legends, pick a static color instead of a rainbow wave, and then stop touching it.
Step seven: add a desk mat before you add anything else. A mat changes how the board sounds more than almost any other accessory you can put on the desk, and it costs less than a set of keycaps. Put the board on the mat, not on the bare desk.
Step eight: run the two-week verdict. After two weeks, ask one question: do you notice the keyboard? If the answer is no, keep it. If you notice the rattle every single day, you have learned something useful about what you value, and your next board should be a hot-swap model with better stabilizers.
The competition and why it lost
Neither of these boards is a custom build and neither is trying to be. They are wired, they use fixed switches, and they exist for people who want a mechanical keyboard without the hobby.
If hot-swap is a requirement for you, that is a different shopping trip. Value-brand hot-swap boards and the entry-level aluminum kits from the enthusiast brands are where that conversation happens, and they cost more than either board here.
If wireless is the priority, these two are out, and you should be looking at a 2.4 GHz or Bluetooth board and reading battery-life reports carefully. Wireless is a feature until the battery dies mid-sentence.
If you want a smaller footprint, a tenkeyless or 75 percent layout gives you most of the typing experience without the number pad, and it frees up room for a mouse swing that matters more in games than most people expect.
Today, though, the job is setup, not shopping. Both boards above can type well. Whether they do is decided in the first hour.
What this all costs
The accessories run small: a desk mat and a keycap puller are the only two things I would buy alongside either board, and a puller is optional if you never plan to change a cap.
The real math is per day. Take whatever you paid, divide it by 730, and that is your two-year daily cost. A board you keep for two years is almost free by that measure, which is exactly why the two-week test matters more than the spec sheet.
The cheapest board set up properly beats an expensive board set up badly, every single time. Do the hour of work, keep the board, and stop thinking about it.
That is the job. Your keyboard was built to be typed on. Let it.