Most people who buy a magnetic switch board never actually set it up. They plug it in, the RGB comes on, the keys move, and they type on whatever the factory shipped: mid-travel actuation, rapid trigger off, polling rate sitting at the default. That is not a 60% HE keyboard setup. That is a normal keyboard wearing a Hall effect badge.
The whole point of Hall effect switches is that nothing about the press is fixed. There is no metal leaf to bend and no contact point that closes at a set depth. A magnet moves, a sensor reads how far it moved, and that means you get to decide where the key registers and how fast it resets. So a 60% HE keyboard setup is really four decisions: where the key fires, how it resets, how often the board reports, and how you reach the keys that no longer fit on the deck.
I write code eight hours a day and I game at night on the same desk, and those two jobs want opposite setups. Typing wants a deeper fire point and no surprises. Gaming wants the key to fire almost before you mean it and reset the instant you ease off. The good news is that a board with adjustable actuation lets you run both profiles on the same piece of hardware, which is the reason this category exists at all.
What follows is the order I actually do it in, from figuring out what switch feel you want before you spend anything, to the last firmware tweak. Do it once, save the profiles, and you will stop noticing the keyboard. That is the highest compliment I can give a board.
Why you should trust me
I have built 14 custom boards and I own more sets of switches than I have shelf space for, which my roommate has opinions about. I test every board the same way: two weeks of daily typing on whatever I am reviewing, a stabilizer rattle check before I judge anything else, and a blind feel comparison with my eyes closed so a nice case finish cannot sell me a switch.
Hot swap is non-negotiable in my house. If a board cannot take a different switch without a soldering iron, it is not a board I can recommend, because the switch is the part your fingers actually touch. And I say this as someone who likes soldering.
The other rule is honesty about sound. Rattle is the tell. A cheap board with tuned stabilizers can sound better than an expensive one with loose ones, and I will not pretend otherwise just because the case is aluminum.
How I picked and how I tested
The two things below are not competing products. They do different jobs. One is the board you set up, and the other is the tool that tells you which switch you actually like before you commit to a board at all.
My bar for the board: it has to survive two weeks of daily coding, the stabilizers have to pass the rattle test, and the switches have to come out without heat. My bar for the tester: it has to hold real switches at real spacing in a real frame, not dangle loose samples in a plastic shell, because a switch that feels fine in the air can feel completely different once it is seated next to its neighbors in a plate.
On numbers, I keep it simple. If I cannot hear the difference in a quiet room and feel it with my eyes closed, I do not write it down as a selling point. Feel is personal, and the only way to know your own preference is to press switches yourself.
The gear you need before you start
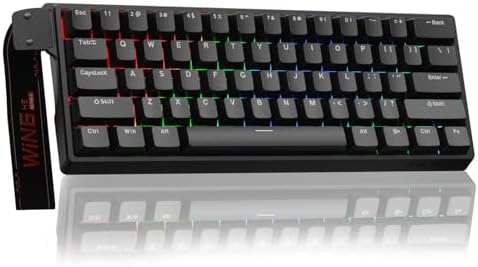
Our pick: Aula WIN60 HE - 60% Mechanical Gaming Keyboard Wired, Magnetic Switch Hot Swappable, Adjustable Actuation Rapid Trigger Mode, 8000 Hz Polling Rate, RGB Small Keyboard 60 Percent Compact Design for PC
 Visit on Amazon →
This is a 60% board with magnetic switches, hot swap sockets, adjustable actuation, rapid trigger mode, and an 8000 Hz polling rate, wired over USB so the polling rate is not fighting a wireless radio for bandwidth. The compact layout is the tradeoff: no arrow keys, no function row, no numpad. Everything lives on layers, and that is a skill you build once.
What I like about this class of board is that it hands the setup to you. Adjustable actuation means the fire point is a setting, not a manufacturing spec you have to live with. Rapid trigger means the key resets the moment you ease off it, which is the feature that makes HE boards feel genuinely different in a game and slightly strange in a document. Hot swap means that if the stock switches are not your feel, the board is not a sunk cost, it is a platform.
Flaws but not dealbreakers: A 60% deck means you will relearn your arrow keys and your function row, and the first week will be annoying. Budget HE boards also tend to arrive with stabilizers that need attention, so budget ten minutes for that before you judge the sound. Wired only is a feature here rather than a flaw, since an 8000 Hz polling rate and a battery do not belong in the same sentence.
Anyone who types and games on the same desk and wants the fire point to be a setting rather than a spec sheet line should start here.
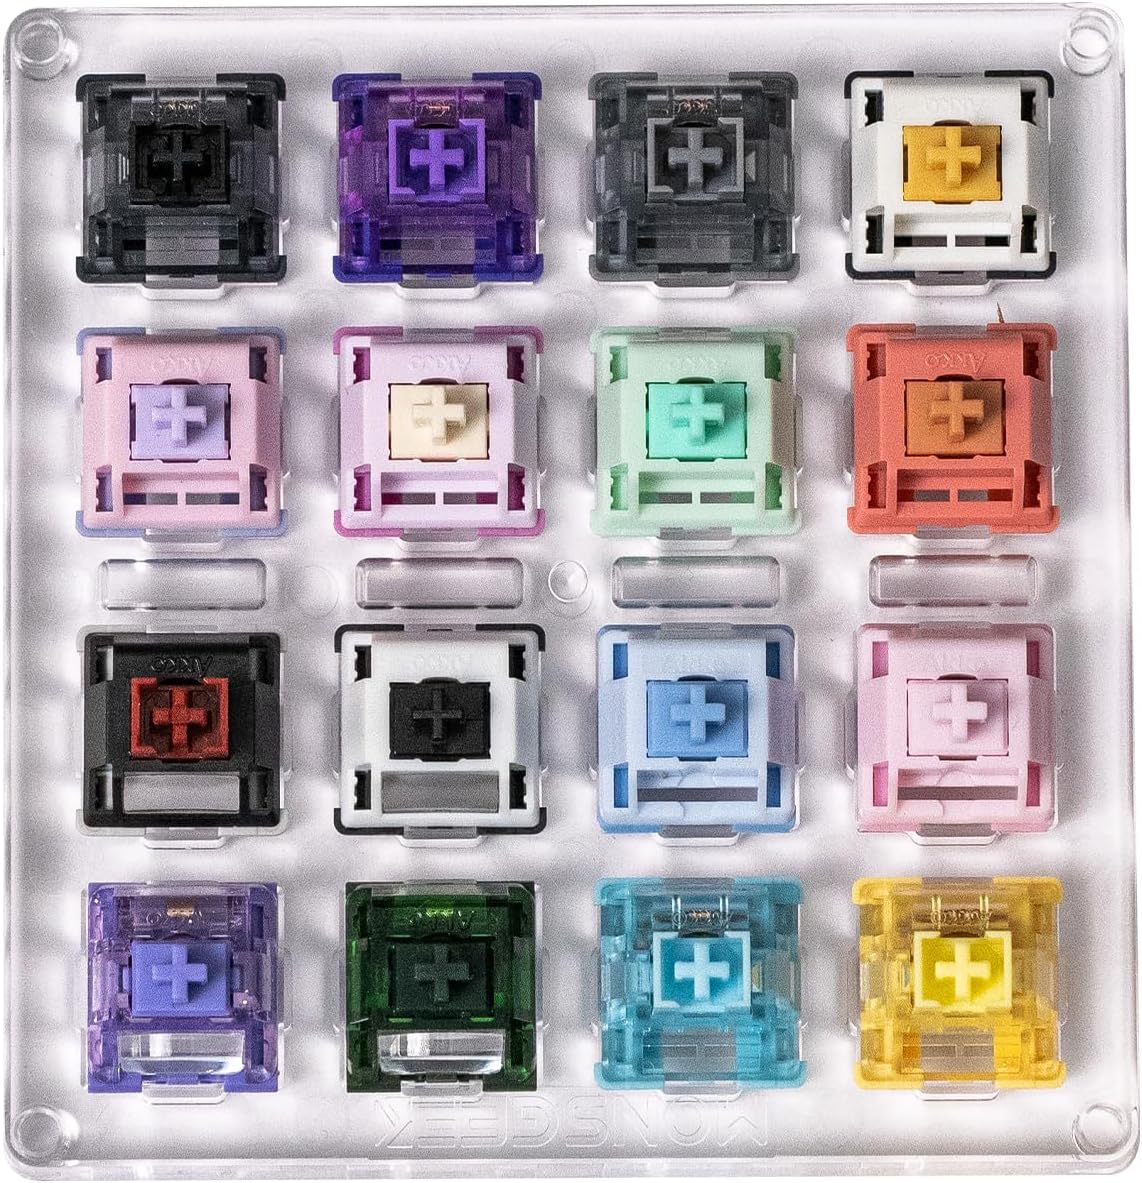
The tester: Akko 16-Key Switch Tester Mechanical Keyboards Acrylic Testing Tool Mechanical Keyboard Switches
 Visit on Amazon →
This is the cheap part that saves you money. Sixteen keys in an acrylic frame that holds switches at proper spacing, so you can press a linear, a tactile, and a clicky next to each other and find out which one you actually want before you buy a set you will not use.
Here is how I use a tester. Put it flat on the desk, close your eyes, and press each position the way you actually type, not the way you press a demo in a store. Type a sentence in your head on each one. The switch that disappears while you are thinking about something else is your switch. The one that keeps announcing itself is not, no matter how good it sounded in a video.
Flaws but not dealbreakers: Sixteen positions is a sample, not a full board, so a switch that feels great in one spot may feel different under a full set of fingers. And it is a tool, not a keyboard. You cannot type on it, you can only audition on it.
Anyone new to the hobby, or anyone about to spend real money on a switch set, should own one of these before they own a second board.
The actual setup workflow
Now the part you came for. This order matters, because every step changes how the previous one feels.
Step one: Seat the switches and deal with the stabilizers. Before you touch a single setting, press the spacebar slowly and listen. If you hear a metallic ping or a rattle on the way down, stop. That is the build quality tell on any board, and no actuation setting will fix it. Lube the stabilizers, add a little dielectric grease at the wire, and reseat the caps. Do this first, because you will otherwise spend an hour blaming the switches for a sound the stabilizers are making.
Step two: Set actuation deeper than you want. This is the step everyone skips. Most HE boards let you choose a fire point anywhere from a hair above the bottom of travel to a few millimeters in. New owners immediately go shallow because shallow sounds fast. Then they get doubled letters, because their fingers rest heavier than they think. Start deep, live with it for a full workday, and walk it up a notch at a time until you find the point where accuracy starts to suffer. Then back off one notch.
Step three: Add rapid trigger, and turn it off for typing. Rapid trigger resets the key the instant you release pressure rather than waiting for the switch to travel back past a fixed point. In a game it is the whole reason to buy an HE board, and it is not marketing. In prose it will fire mid-word when your finger relaxes between letters. Keep it in your gaming profile and out of your typing profile.
Step four: Build two profiles and name them. One for typing, one for gaming. Typing gets the deeper actuation and no rapid trigger. Gaming gets the shallow actuation and rapid trigger on. This is the single biggest advantage of an adjustable board, and most people never use it because they set one profile and forget the software exists.
Step five: Set the polling rate last. An 8000 Hz polling rate means the board reports to your PC far more often, which matters in a game where a millisecond is a decision. It also means more USB traffic, so plug the board directly into a rear port rather than a hub, and if your system stutters or your mouse starts acting strange, drop the rate down. High polling is a tool, not a personality.
Step six: Fix the 60% layout with layers before you fix anything else. No arrow keys means you need a plan. Put your arrows on the function layer under the keys your right hand already rests on, and put your function row under the number row. Do it once, deliberately, and the layout stops being a compromise. Do it randomly and you will be reaching for keys that are not there for a month.
Step seven: Skip software that wants an account. You should be able to change your actuation point and your lighting without creating a login. If the config tool demands one, look for a web configurator or an offline build first. This is a pet peeve of mine and it is worth voting against with your setup.
Step eight: Change one variable per week. Actuation, rapid trigger, polling, lighting. One at a time. If you change three settings and your typing gets worse, you have learned nothing.
Common mistakes I see on budget HE boards
Setting actuation shallow on day one, then concluding the board is inaccurate. It is not, you just trained your hands on a different fire point.
Leaving rapid trigger on for everything. It is a gaming feature that happens to be switchable. Treat it that way.
Judging the sound before touching the stabilizers. Rattle is a five dollar fix and a permanent first impression.
Buying a switch set before trying switches. The tester exists precisely so you do not do this.
Cranking the polling rate on a hub, then blaming the keyboard for the stutter.
The competition and why it lost
Wooting's analog switches are a genuine innovation and rapid trigger on a Wooting is the reference point for HE gaming, but that is the premium tier, and this article is about dialing in a budget 60% board rather than admiring the expensive one.
Keychron's Q series is still my value recommendation in the mechanical world and the K series is the best entry point, but a contact board cannot give you a fire point that moves. That is a different problem than the one this article solves.
Ducky is overpriced for what you get now. The legacy is real, the value has faded. GMMK's Pro line still has the best build quality per dollar in the aluminum tier, and Epomaker wins the budget wars, but check the stabilizers first thing on any Epomaker board, because that is where the money gets saved.
And a full size board with dedicated arrow keys and a numpad is a perfectly good choice for a lot of people. It is just not this guide, because you cannot fit layers you do not need onto a deck you do not have.
What this all costs
Both items here sit in the budget tier, and I would rather you check the current price on each than trust a number printed in an article, including this one. Check current Amazon price on the board, check current Amazon price on the tester, and the math takes care of itself.
Think about it as cost per day. A board you type on for two years, every working day, costs very little per day no matter what tier it sits in. A switch set you bought on a whim and never installed costs full price per day of zero use. The tester is the smaller purchase and the one that prevents the bigger mistake, which is the whole argument for buying it before you buy anything else.
The board is the platform. The setup is the value. Twenty minutes of deliberate actuation tuning, a stabilizer fix you do once, and two saved profiles will do more for how your keyboard feels than another switch set, another keycap group buy, or another board. That is the job. Your board was built to be adjusted. Adjust it.